

Where to look
A field guide or locality guide will tell you where to see different kinds of birds. The Atlas of bird distribution in New Zealand, 1999–2004, published by the New Zealand Ornithological Society, indicates where to find each species. The maps for the atlas have been reproduced for each species on the website New Zealand Birds Online. This website also provides bird lists for several hundred localities, and for the entire country.
As some birds move with the seasons, check first that the time of year is right. For shore birds, check the local tide times. At high tide, birds will be at their shoreline roosts. Between tides is better for watching them feed.
Identifying birds
A field guide with clear drawings or photos is the first key to identifying species. It also helps to listen to recorded calls of the birds you are likely to see – or you can use the 'Identify that bird' feature on New Zealand Birds Online.
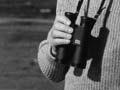
Choosing binoculars
Binoculars are an essential tool for birdwatching. The ideal format is 8 x 30 – giving eight times magnification and a wide field of vision. Binoculars with higher magnifications are larger, and harder to hold steady. The 7 x 50 binoculars are heavier and of lower magnification, but easier for watching birds from an unsteady boat.
Binoculars should work well in low light, with a minimum of colour distortion, and be able to focus on birds close to you. You may need a telescope to watch shore birds out over tidal flats, but the birds will come closer at high-tide roosts.
Making notes
Amateur birdwatchers can contribute valuable information about New Zealand birds. There is still a lot to learn, even about the common native species. Keep a notebook, marking the date, time, conditions and place for each observation. Record the bird behaviour, and report your findings to the local ornithological society or museum, or to New Zealand eBird or NatureWatch NZ.
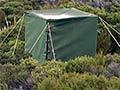
Using hides
A hide is usually a small tent-like structure, which does not flap in the wind – useful for close-up observation. It seems that most birds cannot count: if there are two people in the hide, and then one person leaves it, the birds will behave as though the hide is empty. The pretence must be kept up. The helper must return to collect the birdwatcher from the hide, so that an arrival always precedes a departure. As a result, the birds ‘assume’ that the hide is always empty in between times.
A car can become a hide if parking near the birds won’t disturb them or damage the environment. If you stay very still, birds often come quite close.
Taking photographs
Choose a camera with a high shutter speed to freeze movement, and zoom lenses for close and distant shots. In New Zealand there is no law against photographing rare species, but it is prohibited and unethical to disturb any native species. Photographing nests can alarm birds and may cause them to leave the nest. Expert bird photographers will move a hide towards a nest over several days. If you are considering doing this, read widely and ask experts, then practise on common introduced garden birds.
Joining an organisation
Groups such as the Ornithological Society of New Zealand (Birds New Zealand) and the Royal Forest and Bird Protection Society of New Zealand provide valuable information and networks for birdwatchers, and welcome any interesting findings.
The Miranda Shorebird Centre, south-east of Auckland, holds a variety of activities and courses, and it is easy to see a range of birds by going on a commercial tour.